Internet Options
- How to Receive Copy of Order Confirmation Emails
- How to change opening hours on website
- How to enable 'Automatically Accepts' Internet Orders
- How to disable 'Automatically Accepts' Internet Orders
- How to Enable Sub-courses
- How to Add Selling Prompts
- How to Add/Change the Confirmation Emails
- How to Enable 'Out of Stock' and How it Works
- How to Add Minimum Order for Internet Orders
- How to Enable the QR Code for Driver Navigation
- FASTHOST
- How to add a free item to online
- Applying Promo Code to Your Order
- PayPal Merchant - How to acquire 'Client ID' and 'Secret'
How to Receive Copy of Order Confirmation Emails
On inTouch first go to ‘Management’

Then ‘Occasional Menu’

Click on 'Internet Options'

Go to 'Confirmation'

You will then see a box called 'Email'

At the bottom you will see 'Send BCC to'
![]()
In this box you will need to add the email where you wish to receive the copy of the confirmation email
![]()
Once done press 'Finished'

And 'Exit'

If you have Online Ordering with us it will ask you to ‘Upload Menu to Website’


How to change opening hours on website
On inTouch first go to ‘Management’
Then ‘Occasional Menu’
Click on 'Internet Options'
Go to 'Times'

You will then see 'Opening Hours'

To change the time click in the box of the day you want to change
![]()
First column is the opening time (Put 0000 if closed)

Second column is the closing time (Put 0001 if closed)

If you have a mid day close then in 'Mid Day Closed' enter the start of the close and when you reopen

Once you have changed the times click 'Finished'

And 'Exit'
![]()
If you have Online Ordering with us it will ask you to ‘Upload Menu to Website’
![]()
How to enable 'Automatically Accepts' Internet Orders
On inTouch first go to ‘Management’

Then ‘Occasional Menu’

Click on 'Internet Options'

Go to 'Program'

In first box on the left 'Orders Received'

Bottom of the box you will need to tick 'Automatically Accepts'

How to disable 'Automatically Accepts' Internet Orders
On inTouch first go to ‘Management’
Then ‘Occasional Menu’
Click on 'Internet Options'
Go to 'Program'
In first box on the left 'Orders Received'
Bottom of the box you will need to untick 'Automatically Accepts'

How to Enable Sub-courses
To enable Sub-courses for online go to Management > Occasional Menu > Internet Options.

Once in Internet Options, Select the 'Sundry' button from the right hand side.

Once in the 'Sundry' menu, look for the 'Options' area and in the bar type 'A'

With this option set, back out to the occasional menu and then back into the 'Internet Options' this time selecting 'Menu' from the right hand side.

Now select the "Course Order" drop down menu and select 'As Table + Sub Course'

With 'Course Order' set, go to course names and add the main Category for the course, for example "Starters"

Any sub-categories need to then be in the same box as the main category but separated with commas

This now allows you to place the items into the sub-categories using the 'Course' drop down box

How to Add Selling Prompts
On inTouch first go to ‘Management’
Then ‘Occasional Menu’
Click on 'Selling Prompts'

You will then see 'Post-order Prompt'

You Click in one of the empty boxes

In top right enter your selling prompt. For example 'Do you want a drink with your order?'

Once you have entered your selling prompt select the items that are included. For example Drinks

Then click on 'Finished'

All the selling prompts will appear in these boxes

The selling prompt will appear just under the basket on the website

They don't appear on the app or mobile browser
How to Add/Change the Confirmation Emails
On inTouch first go to ‘Management’
Then ‘Occasional Menu’
Click on 'Internet Options'
Go to 'Confirmation'
Once in the Confirmation tab you will see multiple boxes

There are 4 Confirmation Emails that you will mainly need: Accept Delivery, Accept Collection, Rejection & Order for Later


Delivery Example
Thank you for ordering from [SHOP NAME]. Your order is now being processed.
Your order should be delivered approximately within the hour
If there are any issues, please contact us on [SHOP NUMBER].
Collection Example
Thank you for ordering from [SHOP NAME]. Your order is now being processed.
Your order should be collected approximately within 15 minutes
If there are any issues, please contact us on [SHOP NUMBER].
Rejection Example
Sorry for the inconvenience, but your order has been declined.
Please call [SHOP NAME] on [SHOP NUMBER] for further details.
Order for Later Example
Thank you for ordering from [SHOP NAME].
Your order will be processed shortly. If there are any issues, please contact us on [SHOP NUMBER].
How to Enable 'Out of Stock' and How it Works
Part 1: How to Enable 'Out of Stock'
On inTouch first go to ‘Management’
Then ‘Occasional Menu’
Click on 'Internet Options'
Go to 'Program'

You will see the option 'Out of Stock'

Click on the drop down and select where you want to have it located

Also whether it 'Applies Instore'

Part 2: How it Works
If Chocolate Fudge Cake isn't available and you want to make it out of stock

On inTouch click the 'Out of Stock' button

Then click on the item that is out of stock

If the item has choices then select the name of the item at the top to make the full item out of stock, or you can also make the individual choices out of stock by selecting those as well (this however will make the choice out of stock for all items that have this choice)

The item will then be added into the list on the right

Once you have done click 'Finished'

On the website Chocolate Fudge Cake now appear Out of Stock

If you did tick 'Applies Instore' then it will appear grayed out

Out of Stock refreshes each day so if the item remains out of stock then you MUST add it back to the list
How to Add Minimum Order for Internet Orders
On inTouch first go to ‘Management’
Then ‘Occasional Menu’
Click on 'Internet Options'


You will see 'Below Minimum Spend of'

In the box '0.00' is where you will enter your minimum order for Internet Orders

Once done press 'Finished'
And 'Exit'
If you have Online Ordering with us it will ask you to ‘Upload Menu to Website’
How to Enable the QR Code for Driver Navigation
***Update to the latest version of inTouch***
Enabling the QR code on the receipt will allow the drivers to enter the delivery address a lot quicker and is more efficient. The QR code appears at the top of the receipt and is partially cut from the actual customer receipt.
Update the program to the latest version
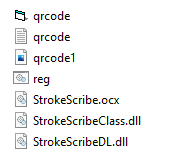
Then copy all the QR code and DLL's from the following location to WINCI (S:\Staff\Alec\SUPPORT\Reg.bat, Browser & QR\QR Code & reg.bat files (Copy all to WINCI))
Run reg.bat then open inTouch

On inTouch first go to ‘Management’
Then ‘Occasional Menu’
Click on 'Options'
![]()
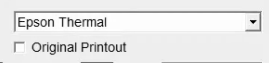
Click on the 'Receipt Printer' tab

Bottom right of the receipt printer tab click on 'More'

Right hand side you will see 'Delivery Orders'

Tick the box that says 'Prints QR Code'

Also make sure 'Original Printout' is NOT ticked
This will enable the QR Code on the receipt. Go to the website and do a delivery order

Accept the Internet Order.
![]()
The receipt will then print out like this.
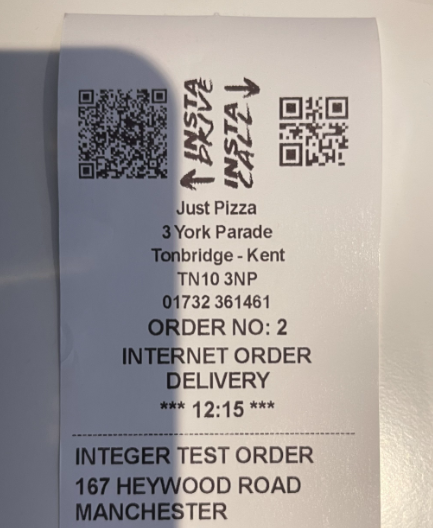
On your phone open the QR Code scanner and scan the code off the receipt.

Once the code has been scanned it it will then open the default map on the drivers phone

FASTHOST
On Fasthost follow the below steps;
Step 1:

Step 2:

Step 3:

Step 4:

Enter Google as the IPS Tag
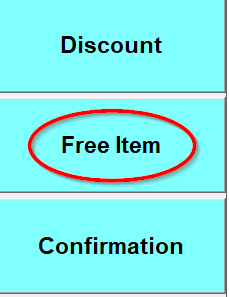
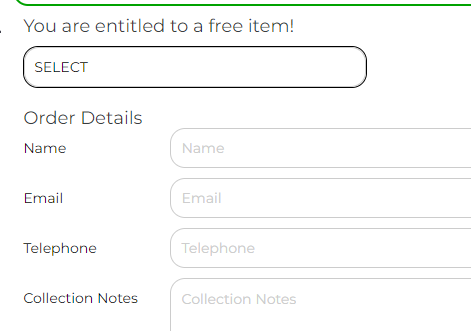
How to add a free item to online
To add a free item to online, first go to 'Management'

Then 'Occasional Menu'

And then 'Internet Options'

Select 'Free Item' from the list on the right hand side of the screen
In 'Free Item' you can set the code customers will use to allow them to get the free item, how much they have to spend for the free item, which days of the week you want the code to be active and the free item customers can get.
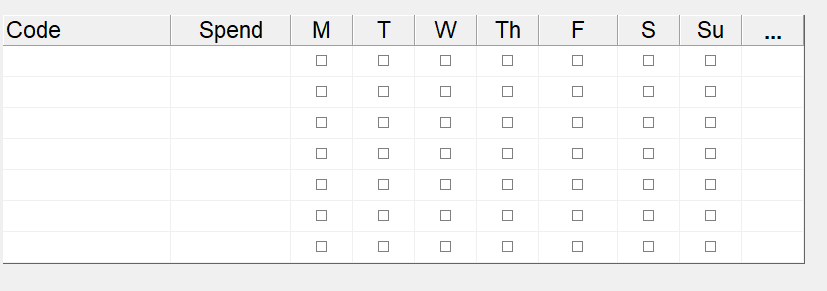
There is also the option for if a customer spends £X they get the free item without a code. this option is found just above and just to the right of the above image.
Enter the code the customer is to use, for example "freedip" for a free dip if a customer spends over £10
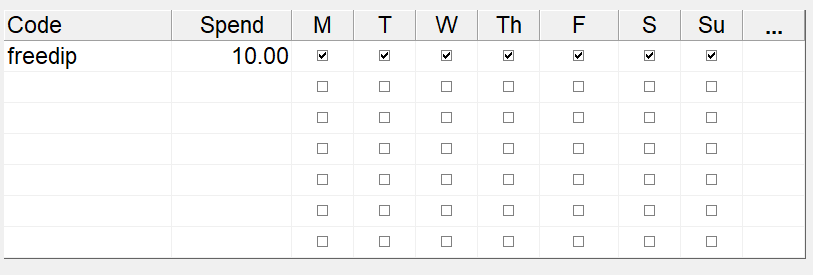
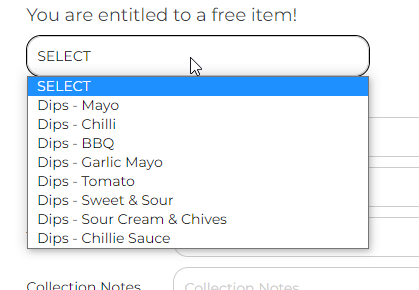
To select the free item you click on the box under the 3 dots, this will bring up a list of compatible items.
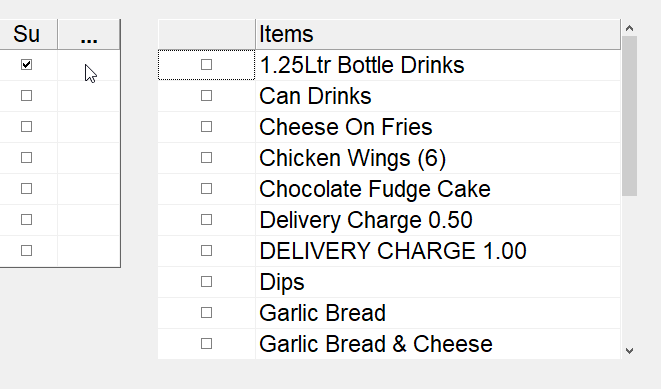
For this code we select 'Dips' and a '*' will show in the box we clicked to show the items.
Now Select 'Finished' followed by 'Exit' and then when prompted to upload to internet select 'Yes'
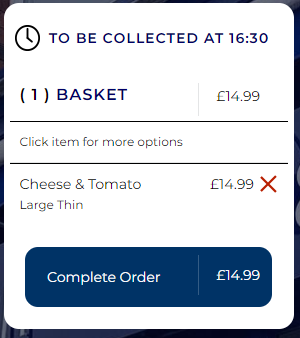
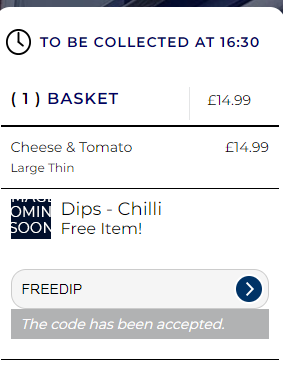
To enter the code, select 'Complete order' and the customer will be able to enter the code at the bottom of their basket
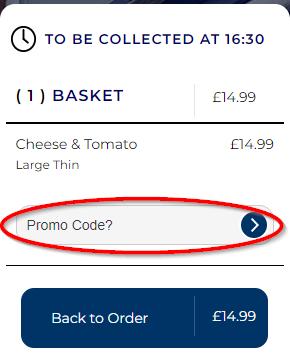
The code will need to be entered into the 'Promo Code' box.
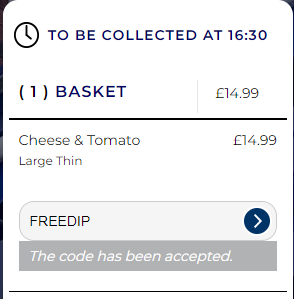
Once the code has been accpeted it will inform the cutomer
it will then allow the customer to select their free item just above where customer details are entered.
Once selected, the free item will then also show in the customers basket as a free item.
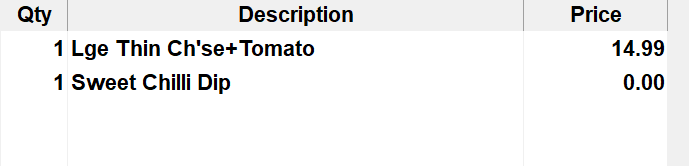
When the item comes through to the shop it will show the item as being free.
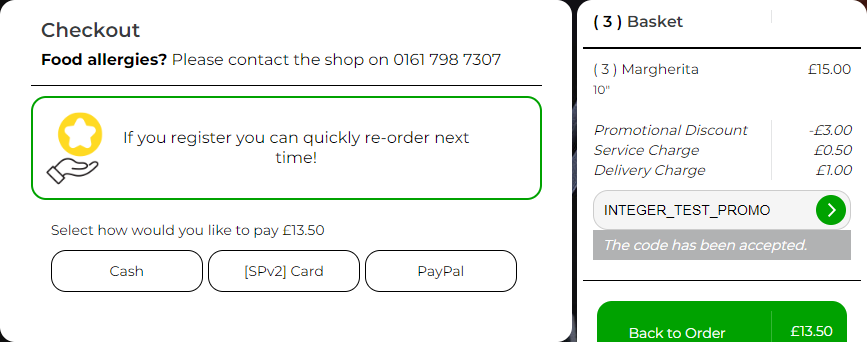
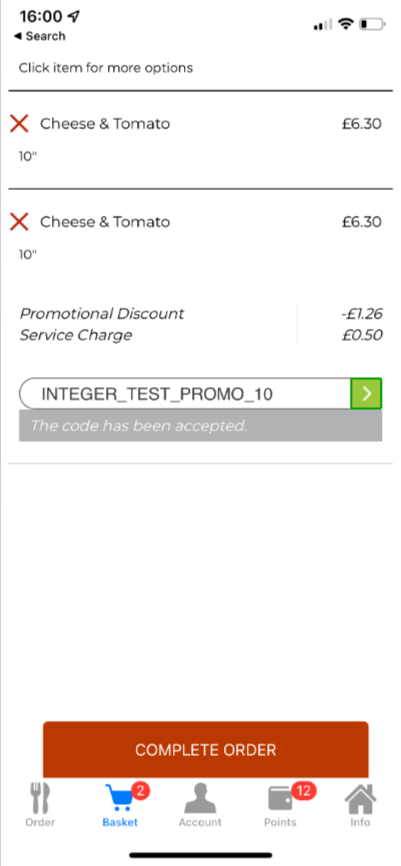
Applying Promo Code to Your Order
To apply a promo code via mobile browser go to the checkout once you're ready complete your order. Click the basket bottom right and you will see a box that says 'Promo Code?'. Enter the promo and click the green circle to apply it. Then click complete order.
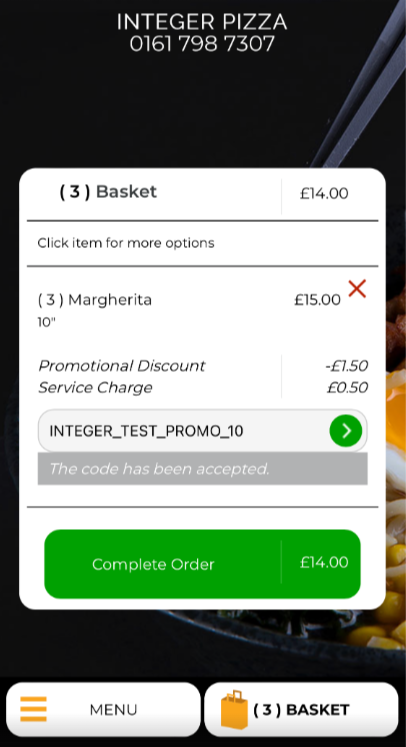
To apply a promo code via computer/laptop go to the checkout once you're ready complete your order. On the right handside you will see a box that says 'Promo Code?'. Enter the promo and click the green circle to apply it.
To apply a promo code via the IOS and Android app go to the checkout once you're ready complete your order. Click the basket bottom and you will see a box that says 'Promo Code?'. Enter the promo and click the green circle to apply it. Then click complete order.
PayPal Merchant - How to acquire 'Client ID' and 'Secret'
This guide will provide instructions on how to acquire your Client ID and Secret from PayPal. Parts of some images below have been blurred out for security reasons.
Each image will enlarge in a new tab once clicked.
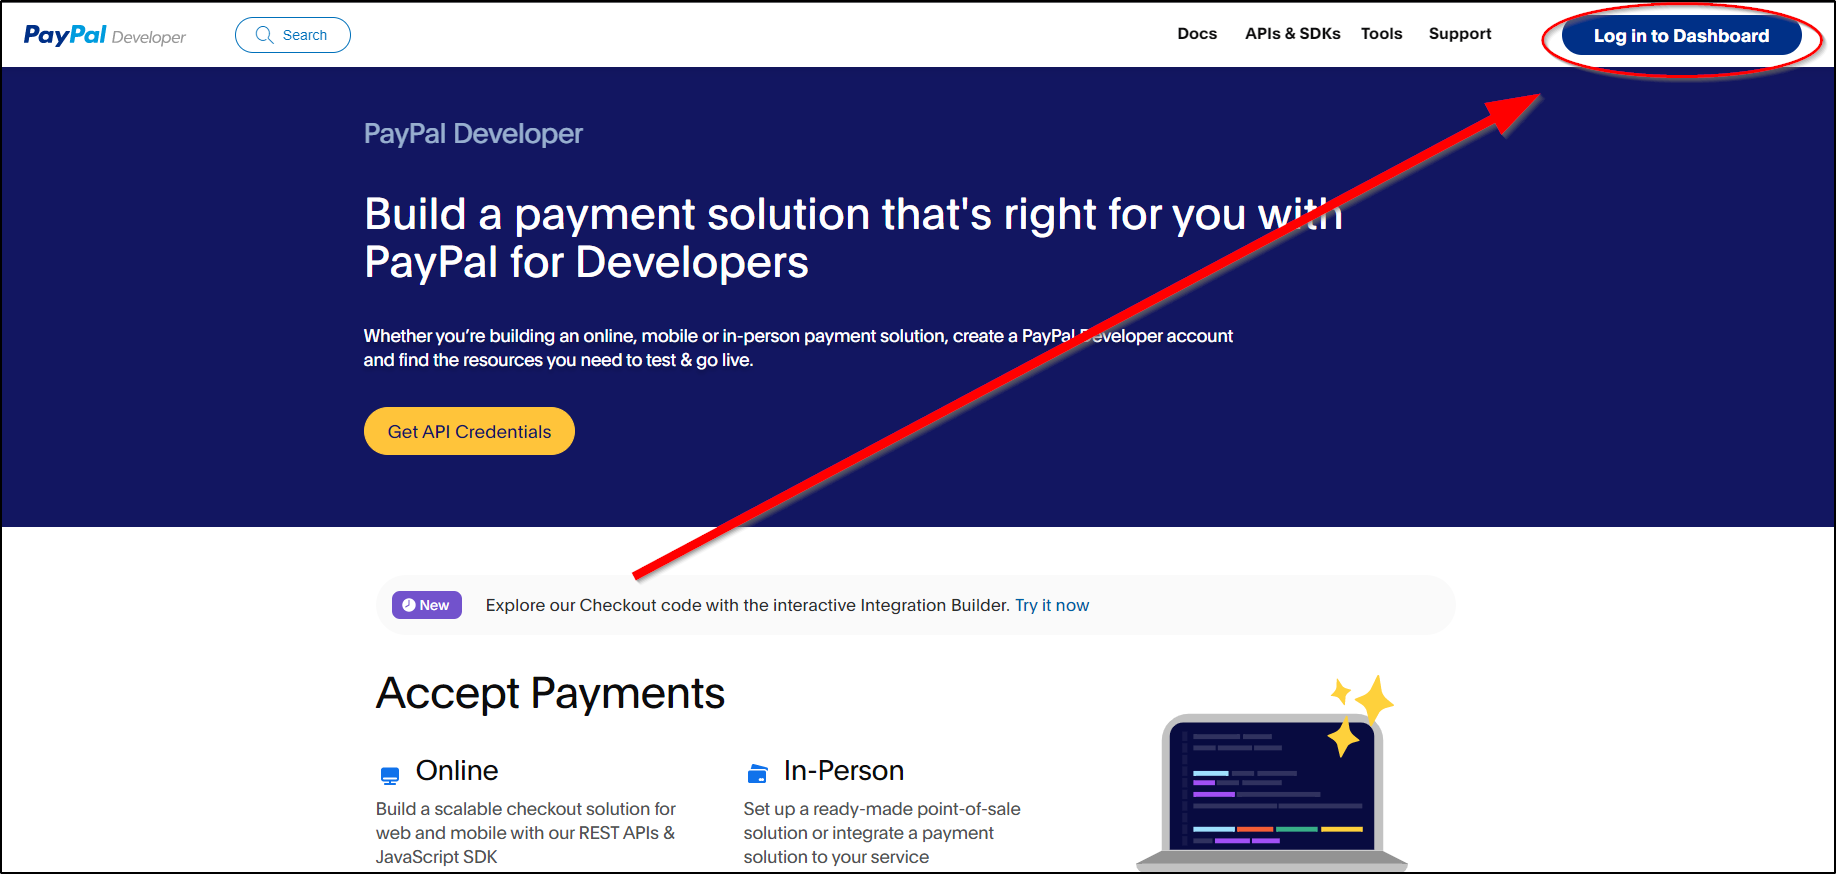
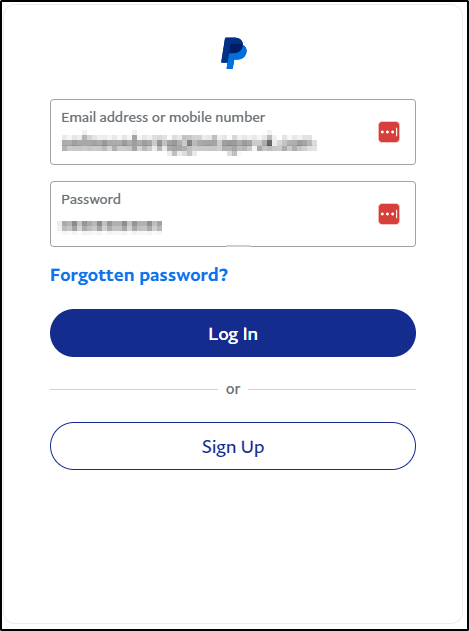
1. Go to PayPal Developer and click 'Log In to Dashboard': https://developer.paypal.com/home
2. Sign into your account. This will require a One Time Pass code (OTP), this can be texted to your mobile phone.
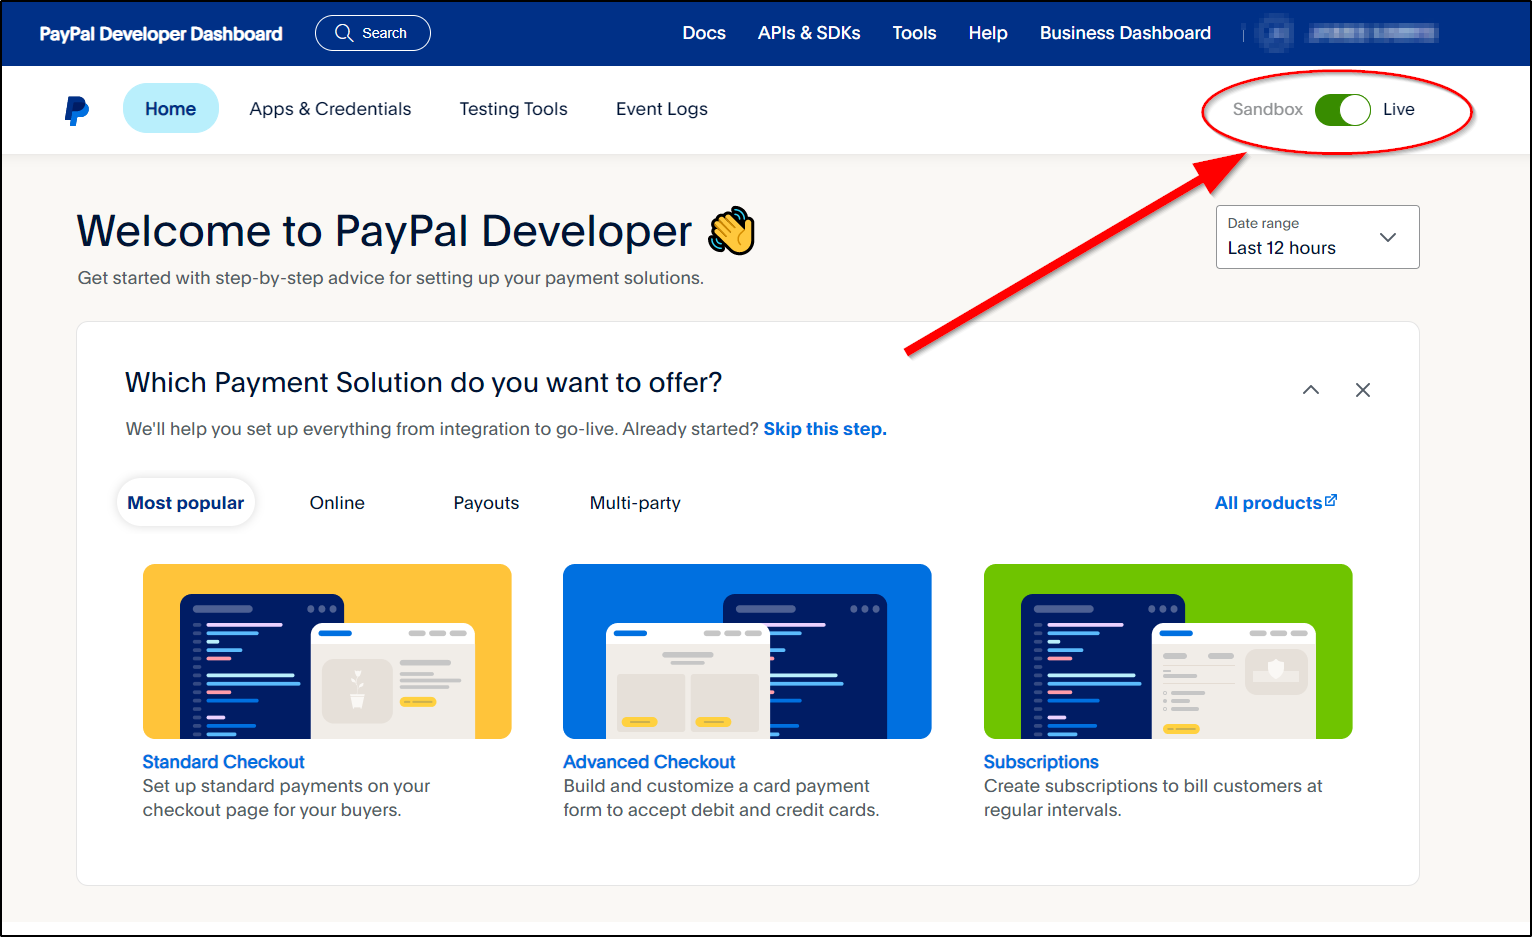
3. Once logged in, set the account to 'Live'. (If the account is set to 'Sandbox', then it may require another login once it switches to live).
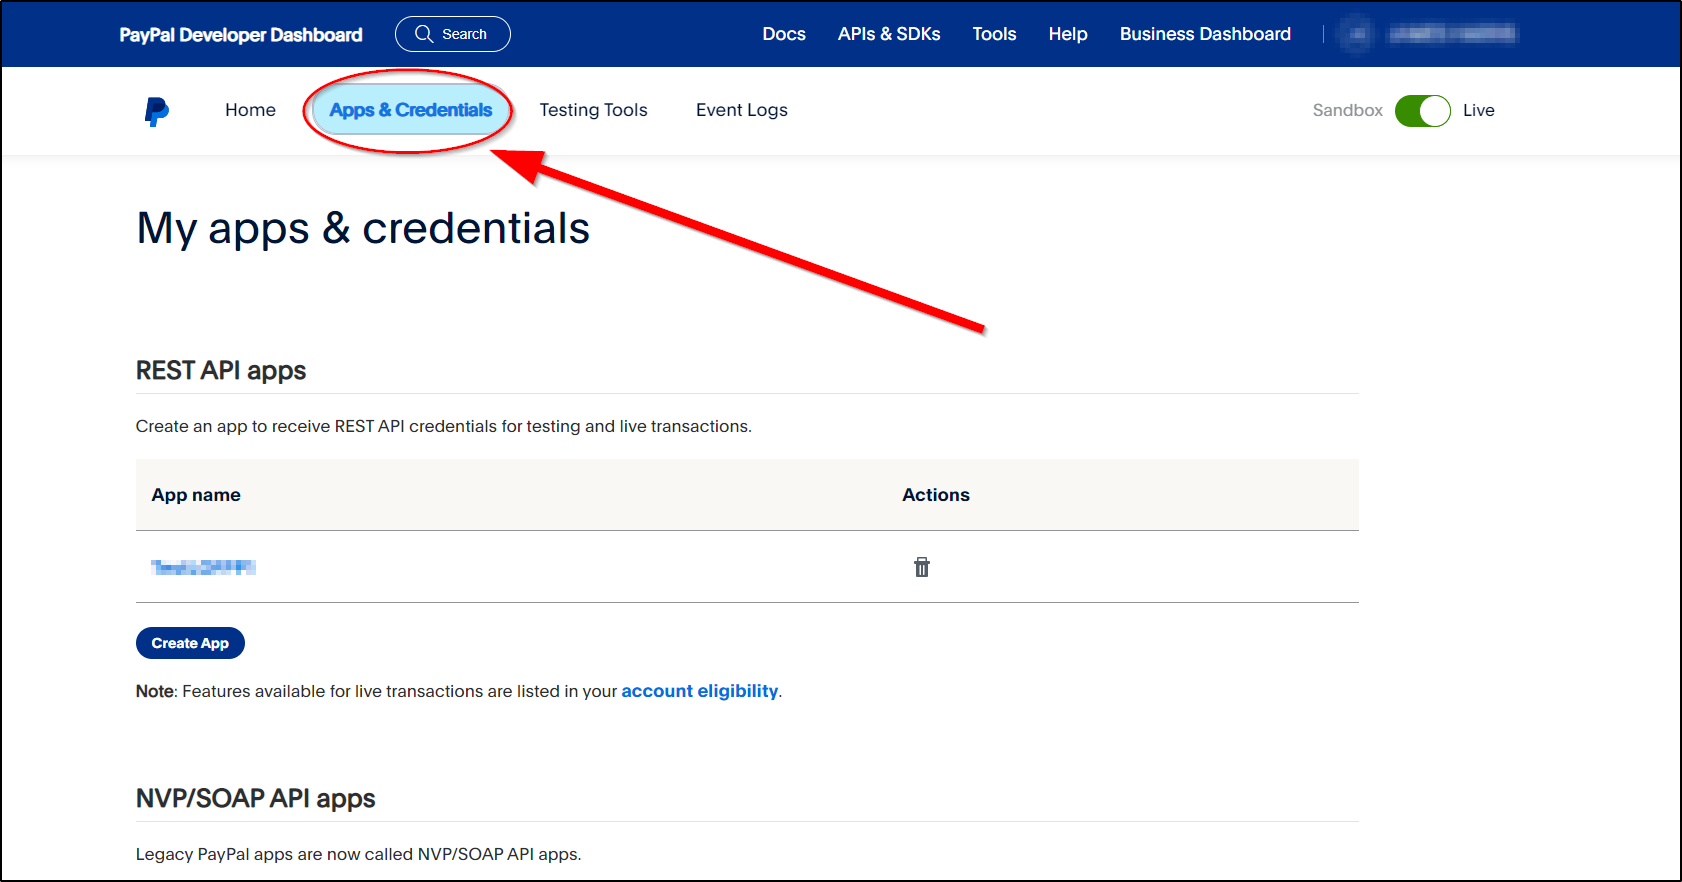
4. Click on 'App & Credentials'
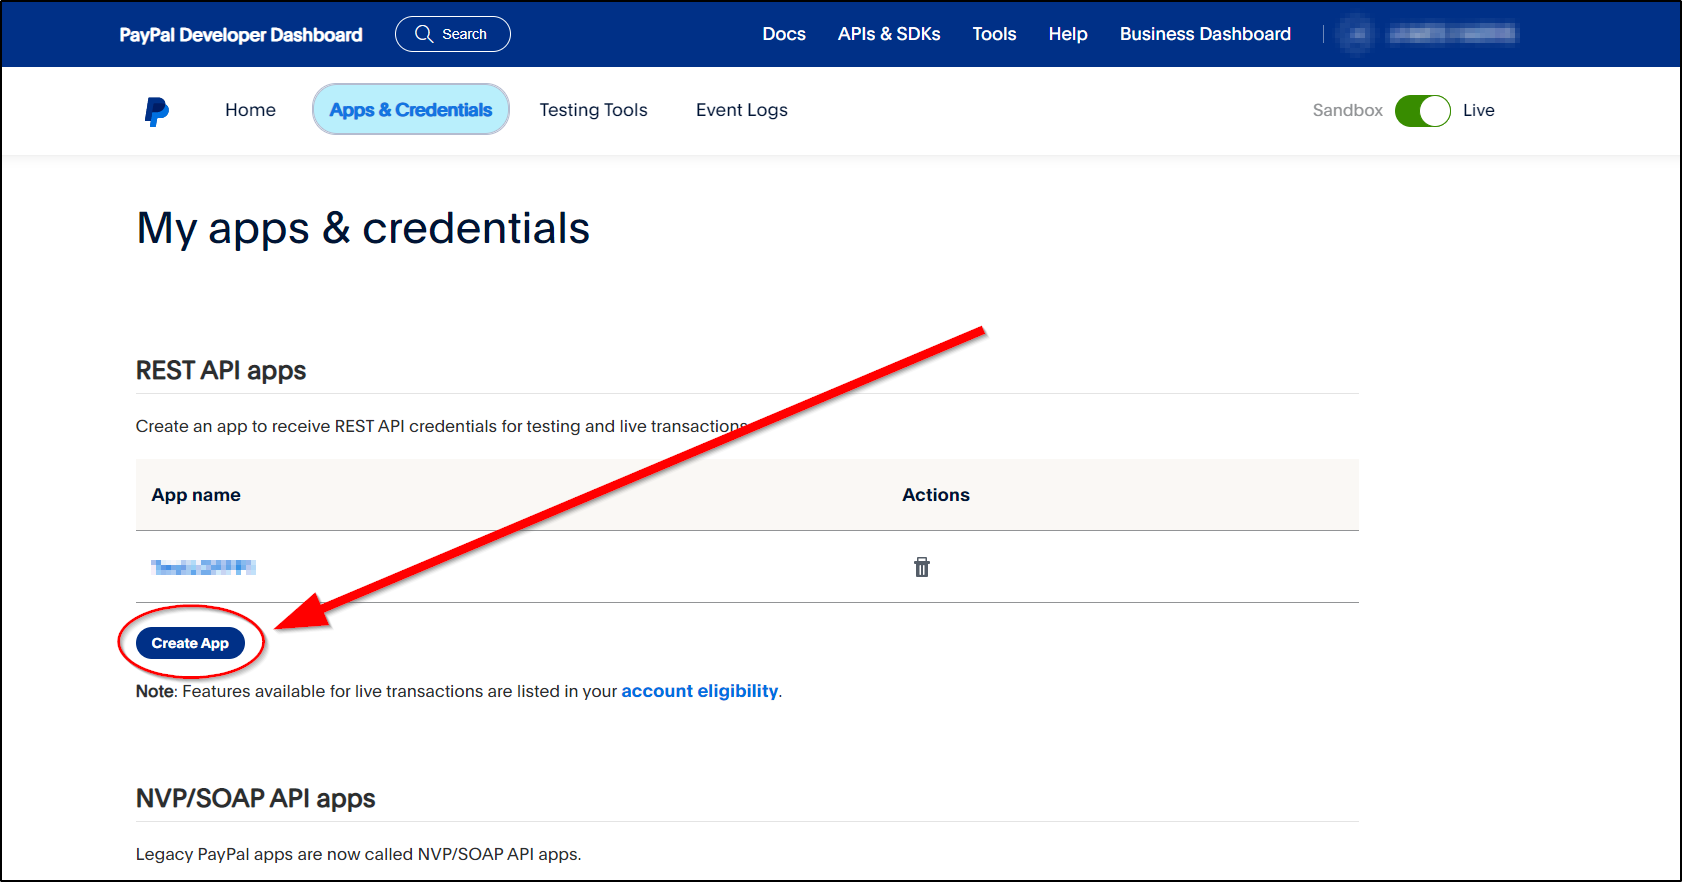
5. Click on 'Create App'.
6. Enter your Shop Name in the 'App Name' box and then click 'Create App'. In this example, I have called my shop 'Integer Pizza and Kebabs'.

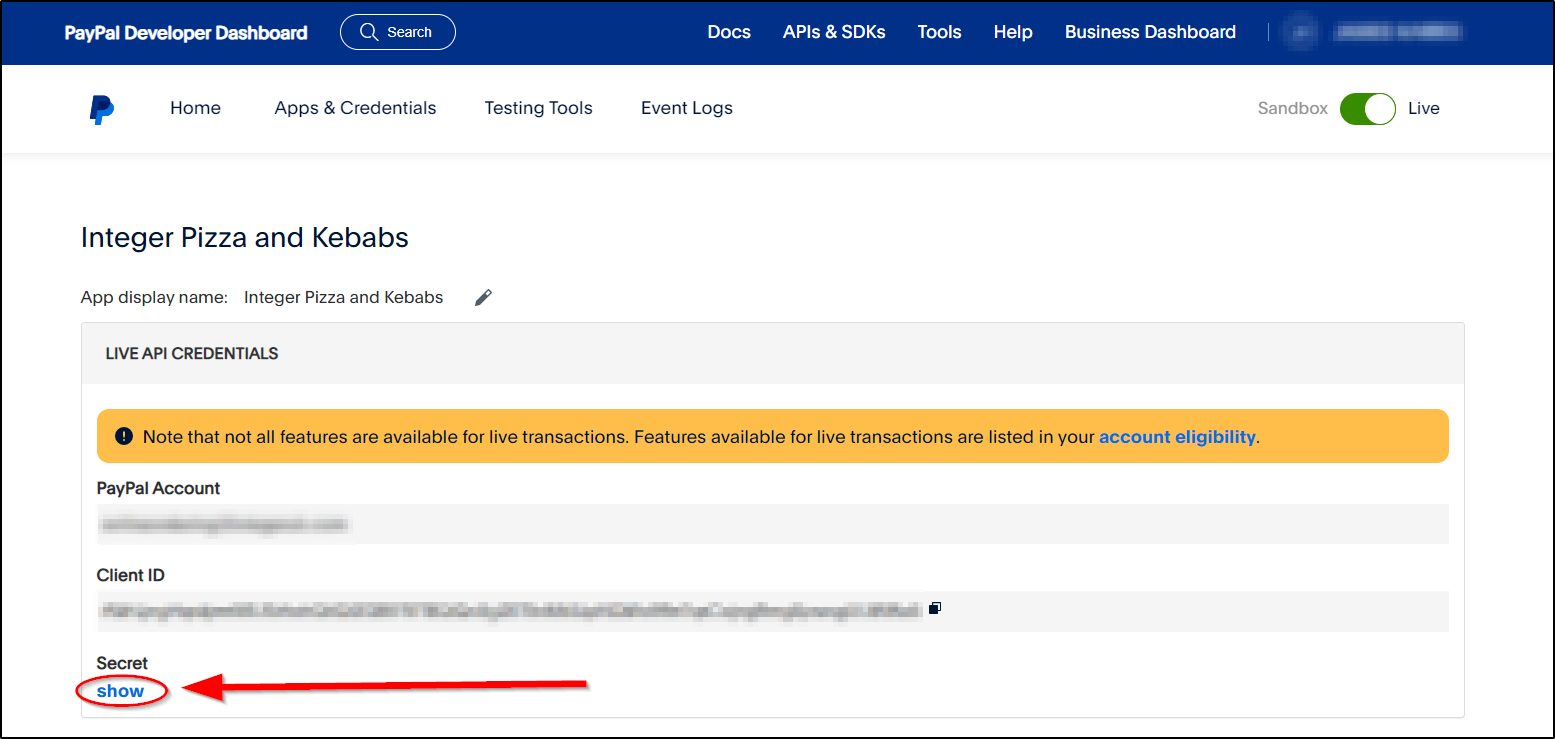
7. Under 'Secret', click show.
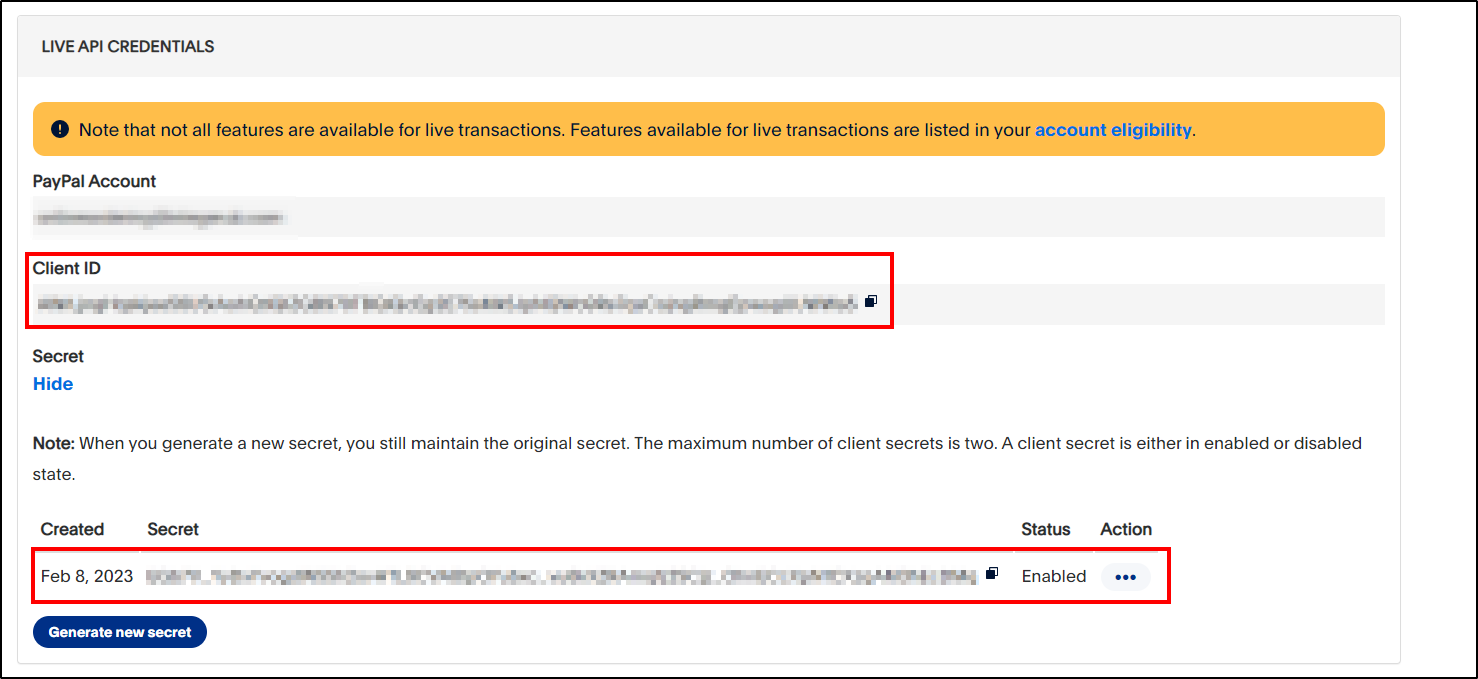
8. Both the Client ID and Secret will be visible to copy. There is a little black icon at the end of Client ID and Secret. Clicking on that logo will automatically copy ( ). This can then be pasted directly into an email or document.

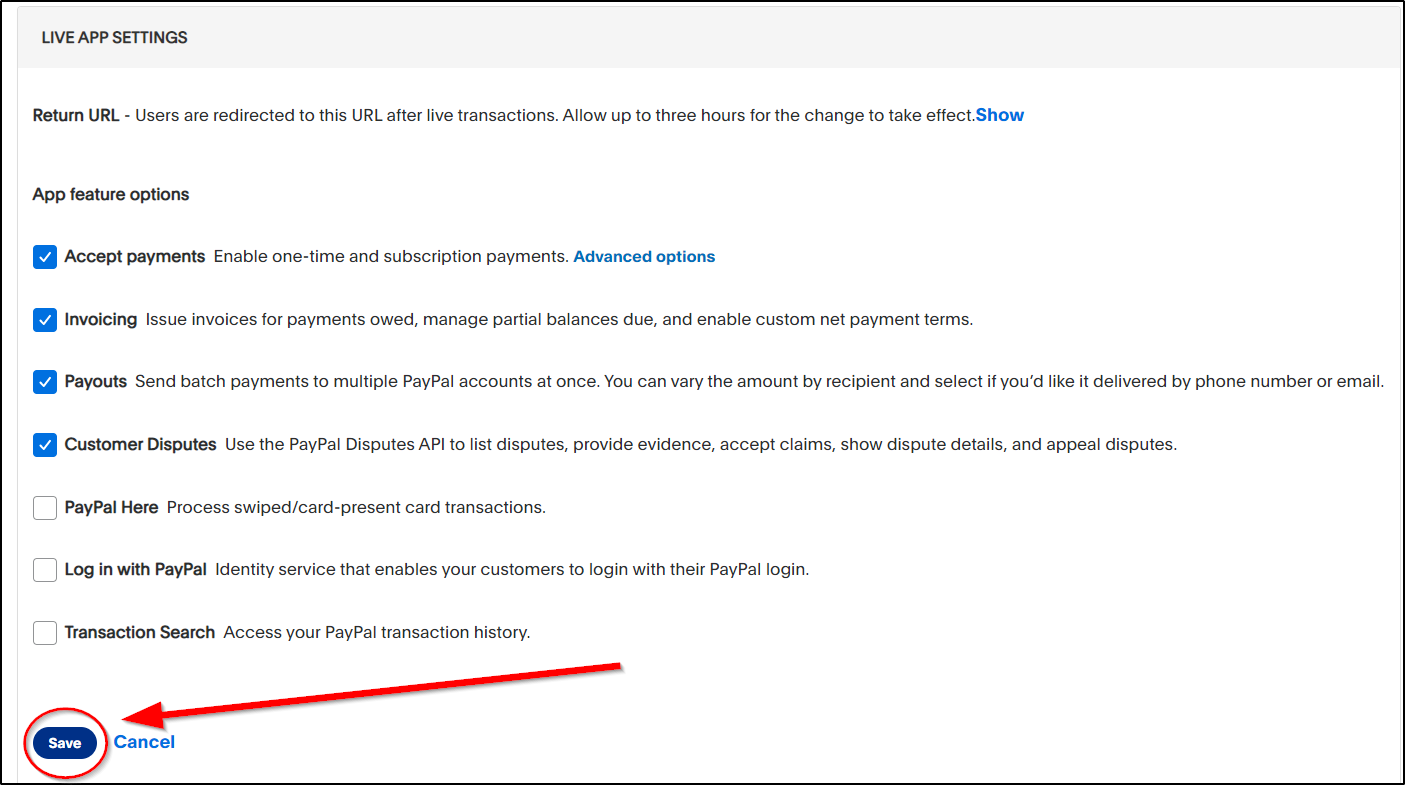
9. Scroll down and click 'Save'.
10. Paypal can now be closed. Please provide the Integer Online Team with the Client ID and Secret.
If you need any additional help with this. Please give Integer a call on 0161 798 7307 and the Online Team will be happy to help.