
How to install the Integer U80II (Ethernet)
***Please call us to get the U80II printer driver***
Unbox your Integer U80II

Plug the power cable into the back of the printer and plug socket

Then plug the Ethernet cable into the back of the printer and a port into your router
Turn the printer on

Once the green light is on go to 'File Explorer'

Click on 'This PC'

Then go to 'C: Drive'

Click on the 'Integer' folder

Open the folder 'Setup_U80 V1.12' folder

Double click on the 'Setup.exe'

Click on the 'Receipt' drop down and select 'U80II'

Click on 'Next'

Click on 'Next'
On the next screen choose "Net" from the drop down and enter the printers IP address in the box and then click install at the bottom.
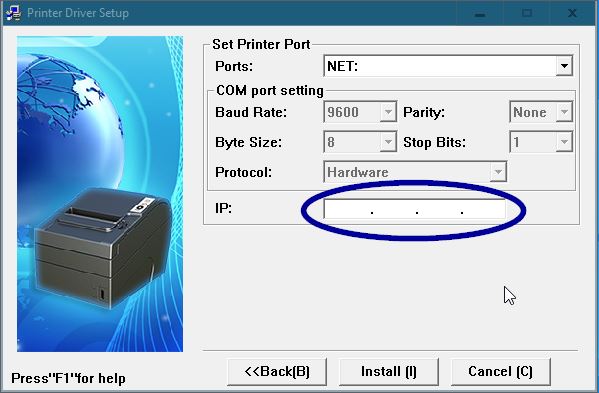
The IP address of the printer is given out by you router so can be different on every network. To find out what it is on the printer power it off, hold the feed button and power it back on. You should now receive a test print from the printer and at the bottom it will give you the IP address of the printer. Press and release feed again to print a bit more of the test print and the printer will now be ready to work.
Once the driver has installed click 'OK'

You will then need to go to the 'Control Panel'

Click on 'Devices and Printers'

Double click on 'U80II(E)'
Click the 'Printer' tab

Then click on 'Properties'

Click in the box that says 'U80II(E)'
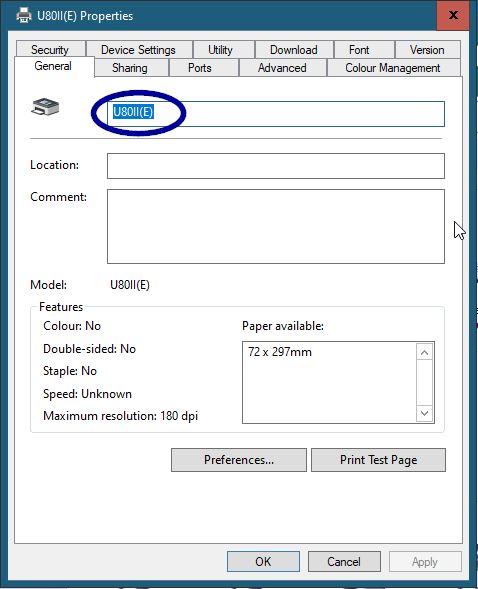
Rename it to 'Receipt'

Then click 'OK'

To check that the printer works go to 'Properties'
In the 'General' tab

At the bottom click on 'Print Test Page'

This will then do test page

Then on the Server in inTouch go to 'Management'

Click on 'Occasional Menu'

Then 'Options'

In the 'Receipt' tab

You will then see 'Printer Type'

Click on the drop down

Select 'Epson Thermal'

Then 'Save & Exit'

And 'Exit'


Then just do a test print
